How to Manage Group Texts on Android: A Comprehensive Guide

Managing group texts can be a bit tricky on Android, especially when it comes to leaving, muting, or removing yourself from these conversations. This guide will walk you through the steps to effectively handle group texts on Android devices, including specific instructions for Google Messages and Samsung Messages.
How to Remove Yourself from a Group Text on Android
Removing yourself from a group text on Android typically involves leaving the group conversation. Here’s how you can do it:
Step-by-Step Instructions
- Open the Messaging App: Launch the messaging app where the group text is located. This could be Google Messages, Samsung Messages, or another messaging app.
- Select the Group Conversation: Find and tap on the group text conversation you want to leave.
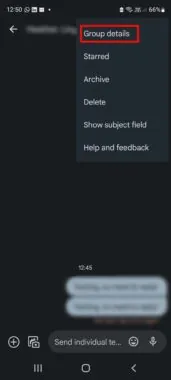
- Access Group Settings: In Google Messages, tap on the three vertical dots (menu) in the top-right corner of the screen. In Samsung Messages, tap on the group name or the menu icon, and select “Details” or “Group Settings.”
- Leave the Group: Look for an option like “Leave Group” or “Exit Group.” Tap on it to remove yourself from the conversation.
- Confirm Your Choice: A confirmation prompt will appear asking if you’re sure you want to leave the group. Confirm your choice, and you will be removed from the group text.
Note that in some cases, if you are not the group admin, you might not have the option to remove yourself, and you may need to ask the admin to remove you.
How to Leave a Group Text on Android

Leaving a group text on Android is similar to removing yourself from a group. The process can vary slightly depending on the messaging app you’re using.
General Process
- Open Your Messaging App: Launch the messaging application that contains the group text.
- Select the Group Text: Locate and tap on the group text conversation.
- Open Group Options: Tap on the group name or the menu icon to access group options.
- Find the Leave Option: Look for an option to “Leave Group” or “Exit Group.”
- Confirm Leaving: Confirm that you want to leave the group. This action will typically remove you from the conversation, and you will no longer receive messages from that group.
How to Mute a Group Text on Android

Muting a group text allows you to stop receiving notifications from the conversation without leaving the group. Here’s how you can do it:

For Google Messages
- Open Google Messages: Launch the Google Messages app on your Android device.
- Select the Group Text: Find and tap on the group conversation you want to mute.
- Access Group Details: Tap on the three vertical dots in the top-right corner and select “Details.”
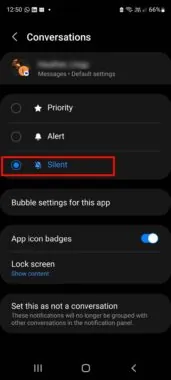
- Mute Notifications: Look for the “Mute Notifications” option and toggle it on. You can choose the duration for muting notifications, such as 1 hour, 8 hours, or until you manually turn it off.
- Confirm Settings: Once muted, you will no longer receive notifications from the group text.
For Samsung Messages
- Open Samsung Messages: Launch the Samsung Messages app on your Android device.
- Select the Group Text: Tap on the group text conversation you want to mute.
- Access Group Settings: Tap on the group name or menu icon and select “Details.”
- Mute Notifications: Find and tap on the “Mute” option. Choose the duration for muting notifications from the available options.
- Save Settings: The group conversation will be muted according to the selected duration.
How to Mute a Group Text on Google Messages
Google Messages provides an easy way to mute group texts to help you manage notifications better.
- Open Google Messages App: Launch the Google Messages app on your Android device.
- Select the Group Conversation: Find and tap on the group text conversation you wish to mute.
- Open the Menu: Tap on the three vertical dots in the upper-right corner to open the menu.
- Select “Details”: Choose “Details” from the menu options.
- Mute Notifications: Toggle on the “Mute Notifications” switch. You can set the mute duration to your preference.
- Confirm Your Choice: After muting, you won’t receive any notifications from the group text until you manually unmute it.
How to Mute a Group Text on Samsung Messages
Samsung Messages also allows users to mute group texts to avoid unnecessary notifications.
- Launch Samsung Messages: Open the Samsung Messages app on your device.
- Select the Group Text Conversation: Locate and tap on the conversation you want to mute.
- Open Group Settings: Tap on the group name or the menu icon to access group settings.
- Choose “Mute”: Find the “Mute” option and tap on it.
- Set the Mute Duration: Select the duration for muting notifications (e.g., 1 hour, 8 hours, or indefinitely).
- Confirm Settings: Your notifications from the group text will be muted based on the selected duration.
FAQs
Can I remove myself from a group text if I am not the admin?
Yes, you can usually leave or remove yourself from a group text even if you are not the admin. However, the exact option may vary depending on the messaging app you are using.
What happens if I mute a group text?
When you mute a group text, you will stop receiving notifications for that conversation. The messages will still be delivered, but you won’t be alerted until you manually unmute or check the conversation.
Can I mute a group text indefinitely?
Yes, most messaging apps allow you to mute notifications indefinitely, meaning you won’t receive any notifications until you manually unmute the conversation.
Will muting a group text delete the conversation?
No, muting a group text only affects notifications. The conversation will remain in your messaging app, and you can still access it at any time.

Curtis, a Canadian content creator based in Vancouver, BC, has been with unfites.com since August 2024. With a strong passion for gaming, music, ice hockey, and mobile technology, Curtis previously wrote for Elite Prospects and Monstercat while pursuing his studies in English Literature and Language at UBC. He began his content creation journey in 2010 and has been writing professionally since 2014.